
latest
habitat tv

Say goodbye to the morning scramble for keys, coats and sunglasses and hello to this… see this and more videos
blog

Kandinsky called, and he wants to move in!
Not all homes are made the same – and thank goodness for that! Tucked away… more
 look book
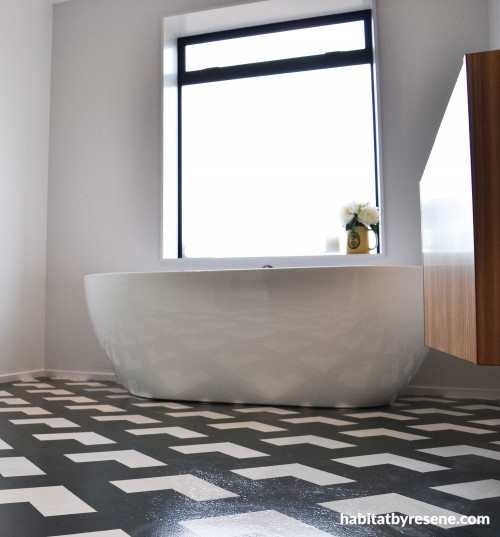
Want the look? Michele colour matched the Cassini bath and Alora showers with Resene Alabaster and kept the walls around the shower this colour so that the acrylic liner visually ‘disappeared’. She painted the other walls in Resene Concrete. The vanity is in Tasmanian Ash Veneer from Laminex.

DIY: painted bathroom tiles
When you don’t want (or can’t afford) tiles in your bathroom you can still get bold with colour and pattern.
In her new build home, Michele and husband James worked out quite quickly that they just couldn’t afford the glossy European tiles they’d dreamed about for their bathroom and laundry floors. Solution? Get creative with paint. And plenty of masking tape.
Michele has gone to town with paint throughout her new build (and has been talking about it on Building Boxes and Stuff.co.nz each week). You can check out her step by step post on getting funky with an upcycled cedar door on habitat by Resene but this time there is more paint and much, much, more masking tape.
How it’s done
1. The first step is to get out of the bathroom or laundry completely and decide on a design for your floor. There are plenty of places to browse online, or if you really want a tile effect, pop in to a tile shop.
2. The next step is to seal the concrete with Resene Concrete Sealer 3 in 1.
3. After the sealer, you start setting down any colour. Michele and James used Resene Lumbersider tinted to Resene Concrete (yes, Concrete on concrete) in both the laundry and bathroom to save time and because of its lovely soft tone.
Paint a minimum of two coats and allow a couple of days for drying so you don’t damage the paint when you add the tape. You do need to use Resene Lumbersider here in order for it to bond effectively with the final coat of Resene Uracryl but this system isn’t recommended for wet rooms with an open shower.
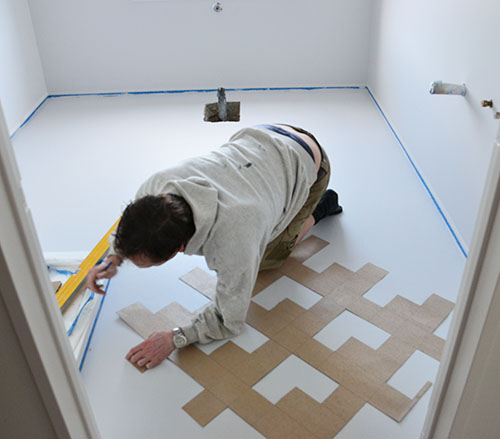
4. James made a template for the bathroom floor pattern out of stiff cardboard. Michele then traced the inside of the template lightly on the floor with pencil, moving the template around till it got as far into the edges as possible. When there were only a few more “tiles” to sketch in, they cut up the template to create smaller pieces.
5. Using blue low-tack masking tape, Michele taped out the inside edges of the areas she wanted to keep in Resene Concrete both in the laundry and the bathroom. In the bathroom she then covered the insides further with masking paper and pressed down over all the edges again to make sure of a good seal.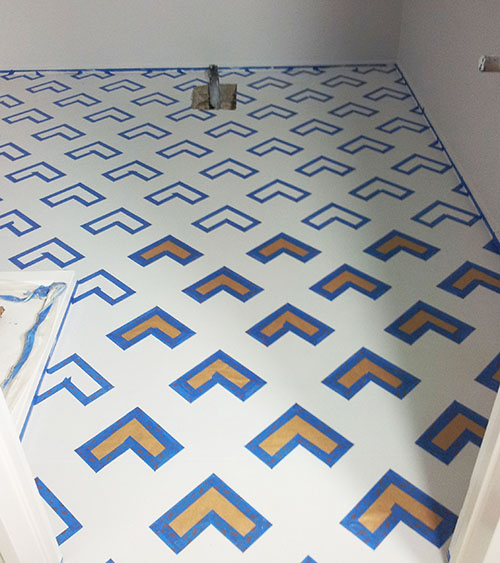
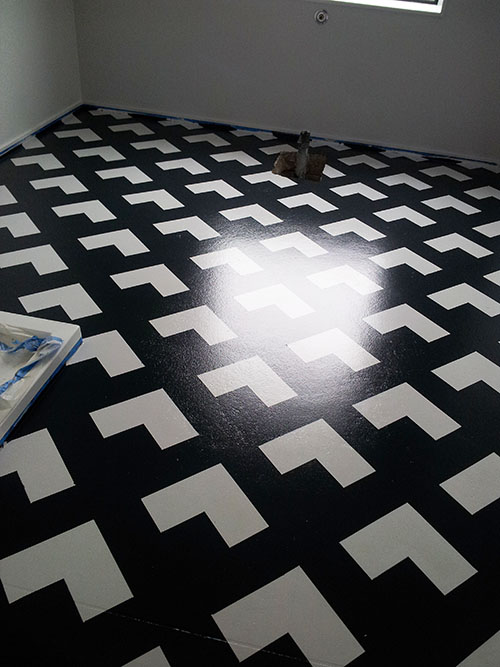
5. Then it was time to topcoat. In the bathroom, this was Resene Blue Charcoal and Quarter Alabaster in the laundry. Two coats and two days later, Michele carefully peeled back the paint and paper to reveal the pattern. Take care when peeling off the tape as the paint can act almost as a giant sticker and peel off in strips very easily.
6. 48 hours later a protective topcoat of Resene Uracryl 402 Clear was added, and it’s done!
Published: 15 Dec 2015
Do you have a home full of wonderful Resene paint and colour? Send us some snaps by emailing editor@habitatbyresene.co.nz.
Want the look? Michele colour matched the Cassini bath and Alora showers with Resene Alabaster and kept the walls around the shower this colour so that the acrylic liner visually ‘disappeared’. She painted the other walls in Resene Concrete. The vanity is in Tasmanian Ash Veneer from Laminex.

Resene Quarter Alabaster

Resene Quarter Alabaster
Resene Blue Charcoal
Resene Blue Charcoal
the look
If you're stuck on what
colour to use or need colour
advice, try out the Resene
Ask a Colour Expert service.
more inspiration


Resene Quarter Alabaster
Resene Quarter Alabaster
Resene Blue Charcoal
Resene Blue Charcoal
the look
If you're stuck on what
colour to use or need colour
advice, try out the Resene
Ask a Colour Expert service.

